Tiny House: Shower…continued

I love 3-day weekends.  Not only was this July 4th, but I got a LOT of stuff done on the tiny house!  Progress AND fireworks?  Yes, please.

Because what is more American than celebrating freedom by lighting things on fire?  And, you know, building stuff.

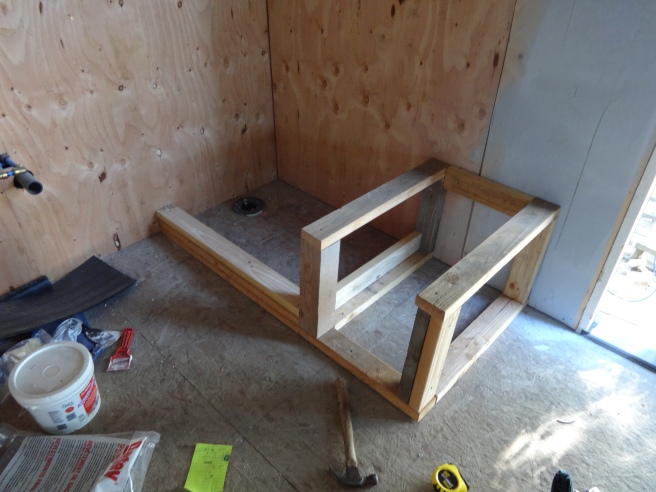
We last left off at the shower pan…  I finished the curb with cement board, which was then completely grouted…

DSC01228

DSC01230

As long as it looks like brownie batter, we’re good…according to the Youtube.

DSC01229

DSC01233

Then I wanted to make the transition from the wood to the rubber sheet a little smoother (not that it really mattered, but I did anyway).  I used the webbing stuff that is used to patch holes in drywall.  Why?  Because I found it in a box and thought, “Hmm, I bet that’d work.”  Other than that, I have no official word from a real contractor as to the “correct” way to do this…but, my house, my rules.

DSC01237

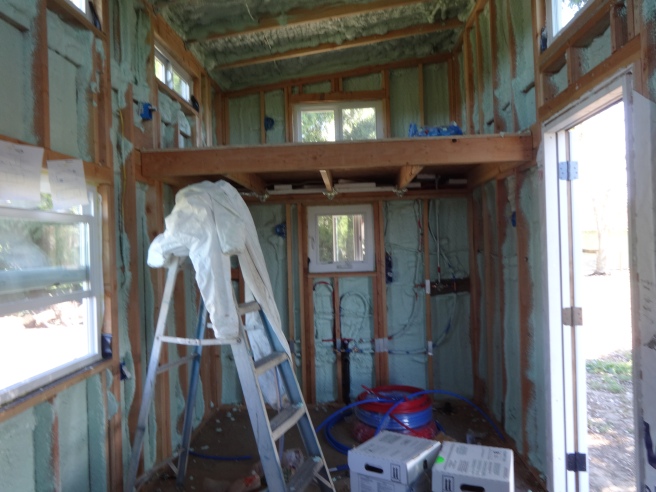
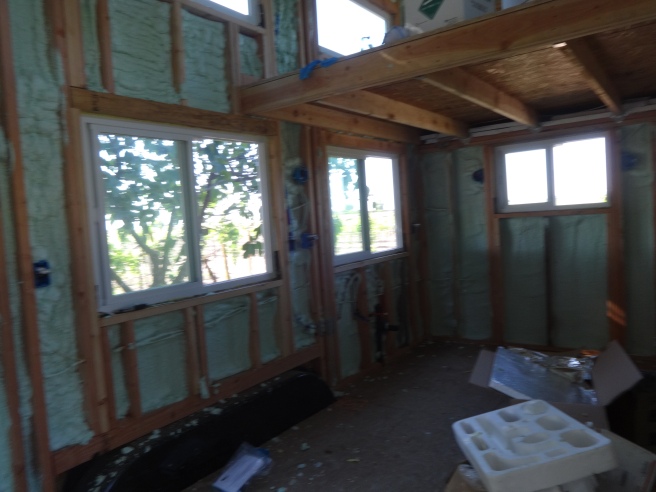
More waterproofing…  That’s called Aquaguard (I think)…it’s Lowe’s version of Red Guard.  It paints on turquoise and dries dark green.  I ended up painting it on the loft floor above the shower too…

IMG_2245

Aaaand my favorite!  RIVER ROCK!

I’m glad it turned out pretty because it was a pain in my backside to lay out.   Since the pan isn’t perfectly 2ft wide, I had to cut off sections of rocks.  But because they aren’t uniform in shape, I had to cut off A rock here, and A rock there.

Also, it was 102 degrees.

IMG_2251

I was able to stay ahead of the thinset drying (just barely) in order to get all the rocks stuck down.  Then I grouted it a few days later.

Decent!

DSC01266

The next part of the shower was figuring out how to keep the metal surround from touching the rocks.  That is a big No-No apparently. The only thing I could think of was weatherstripping used mainly in doors and windows.  As I perused the aisle in Lowe’s, I found a rubber silicone kind that had an adhesive strip on it!  The adhesive isn’t super amazing at sticking, but it was enough to hold it while I caulked the top and bottom of the strip.

DSC01267DSC01268

Then we flash the corners.  I was STOKED that I saved the leftover flashing from the underside of the trailer…remember this?  All those strips I had to cut and screw to the bottom of the trailer in the dirt and heat?  Well, the 10 feet that was leftover I never threw away…

DSC00545[1]

It was PERFECT!

DSC01269DSC01270

Flashing up…

DSC01272

Then first panel up…kind of…

DSC01273DSC01275

The shiplap…

DSC01278DSC01289

The bathroom is now about 80% done!  I do believe it’s coming along nicely 🙂

Tiny House: Shower Pan Extravaganza

The shower. This is the last big project left to do. It’s not so much that the materials are super heavy or that it covers a big area (the shower is only 2×3), but it’s involved.

You can’t put in the tile before you pour the mortar shower pan, but that has to dry and it has to be waterproofed…which also has to dry.

But first…the frame.

Until last weekend, the bathroom was just a box.  In order to have the shower that I want (ie. the shower that would fit), I had to build a frame for the shower pan. I literally could not find a pre-made plastic shower pan that had the dimensions I needed. That is by far the easiest way to go, but since I couldn’t find it I had to figure it out my dang self.

DSC01202DSC01204DSC01205DSC01206

Most of my ideas start on a sticky note.  I work out all the measurements and make sure I have enough wood, then have at it with the saw.  The shower goes in the corner (obviously) and the box-looking thing will be the cabinet for my composting toilet!

Next…the drain.

We needed to connect all the pieces (literally glue with black sticky stuff) and bolt it down.

DSC01209

Oh, and that white stuff? ^ That’s the spray foam insulation.  I used what was leftover underneath the trailer.  It expanded so well that it sealed the flange to the floor and we had to pry it up.  Be careful with that business.

DSC01210DSC01211DSC01213

Buuuut it turned out when we finished the process, the bottom flange ^ stuck up from the floor about 1/4 inch.

Not to worry!  All that can be fixed with scrap plywood.

DSC01212DSC01214

DSC01216

See?  🙂 So much of building is on-the-fly and creative problem solving. Whoever said construction is for those who aren’t smart probably thinks changing a light bulb counts as manual labor.  But I digress.

Then on to the waterproofing.

One major “take away” from this project is WATERPROOF ALL THE THINGS. Whether it’s caulk or spray or thick, intertube-esque sheeting, when in doubt, seal water out.

DSC01217DSC01219DSC01220DSC01224

Pictures make it look so fast. But Nooooooo.  This was quite a wrastling match.  The sheet is thick like an intertube…the black ones that are used for tires and sometimes floating down the river.  It DOES NOT want to cooperate, especially in the corners. Speaking of which, that bottom right corner is bugging me.

The edges are screwed to the wall – above the curb level which is important – to make sure it stays in place.  I left the size pretty much as it came out of the package. I’ve watched some professional tilers on the Youtube who cut it all pretty with very little excess. But I’m not professional.

There’s grace for that, right?

Now we’re on to the bigger stuff…the mortar bed.

First let me say, concrete is surprisingly heavy. It’s super fine like baking flour or powdered sugar, but HEAVY. Especially once you get it wet. Again the Youtube guys were all “oh just get it a little wet, enough that it will hold together when you squeeze it then smooth it out with a 2×4.”

So that’s how I started mixing in the wheelbarrow.  Just a liiiiittle water.

DSC01225

But oh my word~! I could NOT get this stuff to move in to place. I struggled through 3 bucket-fulls of mortar before I was over it and dumped some water on top of the “only-a-little-wet” mortar in my soon-to-be shower.

DSC01226

That worked MUCH better. Actually, it was a lot like pottery class. I ditched the 2×4 and used my left hand (that’s the good one for now…the one without the stupid router bit gouge) to smooth it around.

DSC01227

And I’m happy to report it is perfectly unlevel….sloping from the right down to the left hand drain 🙂

This is far from done, but I think the major part is over. If you’re wanting to install a shower pan, I learned from watching this guy:

He builds a demo on a smaller scale so you can see what’s happening.  I also used his direction for building the curb and more waterproofing…but that’s for later 🙂

Nobody makes me bleed my own blood…but router bits do.

Today was such a good day!  My friend Steve stopped by to say hi, I learned I’m getting a new niece or nephew in October (YAY Steve and Daisha!), got to eat at my fav food truck, AND I finished painting the interior!

Friend Steve …

steve!

I was SO excited to have finished painting that I went down to the Home Depot and bought a router.  This tool I have to have to cut out the wood I put over the windows (so I could paint).  I was stoked that I even knew what tool to get (due to previous research and scouting)…you can imagine my excitement when I got back home and there was daylight left!

But in the middle of opening up the router-bit clamshell package that is designed to survive Armageddon, something slipped.

I looked down and saw this…

DSC01199

That was nothing compared to the crime scene that was now on my hand.

Annoyed that I couldn’t finish the windows, I walked over to the spigot to wash off the torrent of red and see how deep this cut really was.  After about a minute of thorough flushing, I still couldn’t tell.

I had to go in to the main house for a second opinion:  Stitches…or No?

When we finally got the bleeding to stop, this is what it looked like…

DSC01192

Not amused ^

The split…

DSC01193

Pretty clean, right?

My friend Lisbet and I decided that it could probably go either way with the Urgent Care and the stitches.  I could go wait for hours and pay several hundred dollars for stitches, or I could butterfly it at home.  Also, we have wine at home.

Can you guess which one I chose?  🙂

DSC01194

The kitchen ER ^

DSC01195DSC01197

The butterfly ^

DSC01198

The “I’m Super Excited About This” face, also the “I Can Feel My Heartbeat in My Finger” face ^

The paint turned out really well though so at least there’s that… I’d explain more but it kind of hurts to type and 3-finger typing is weird.

DSC01200DSC01201

Lessons for the day:

  1. Rent paint sprayers.  They are worth the money when you can finish painting in 15 minutes.
  2. Gallons of paint are expensive.  Be prepared.
  3. Routers are cool.
  4. Router bits are rat bastards.
  5. Kitchen ERs are far superior to other ERs .
  6. Butterfly, butterfly, butterfly.

Dang.  I could really use some chocolate.

Tiny House – Solar Powered

In an effort to be “off grid”, my house will be entirely solar-powered.  Like I said earlier about the confusion around electricity, solar isn’t much better.

How many watts do I need?  What inverter will handle the wattage?  How big do the batteries need to be?

Sweet Jesus.

I’m so glad that part is over.  Unless you’re “down with electricity” or whatever, be prepared to devote many hours (even weekends) to researching this system.  The good news is that technology has improved to the point that solar is a lot cheaper and much more powerful than it used to be.

solar

I found the best deal on solar panels (and the widest variety of brands and components) at Wholesale Solar in Mt. Shasta, California:  http://www.wholesalesolar.com/

They are super helpful when you call them and have engineers on staff that will set up wiring plans for you.  It’s an extra fee and I’m cheap so I searched online until I found one that included all the components I bought:  https://rvseniormoments.files.wordpress.com/2013/01/ms2000_newmar_inverter_wiring_01_20_2013.jpg

I ended up choosing 2 panels that are 315 watts a piece.  That means they produce 630 watts in ideal conditions (direct sun).  The batteries will hold a total of 5,000 watts (I’m estimating that’s about double what I will need on a super hot day).  I’m also planning to have a generator for just in case…but I haven’t gotten that yet.

The entire system was purchased from a variety of places even though Wholesale Solar carries everything you need.

Since Mt. Shasta City is so close, I decided to make a road trip up there to pick up the panels and batteries….also, that saved me $400 on shipping 🙂

DSC01060

Lake Shasta ^

Panels all loaded up …

DSC01049

Batteries that weigh 120lbs a piece…I can barely get them to move.

DSC01050

Other components fit in this box in the front seat….pretty sure there were switches, a mini breaker box and a few cables in there as well…

DSC01051

Being that I just spent over $2000 for the solar stuff, I had Spendingitis (the technical term for being weary of seeing so much money go out the door).  Naturally, I was hesitant to call Wholesale Solar and ask about the solar panel racks….I just had a feeling they would be expensive.  When I talked to the guy on the phone he explained that for the panels I got, they only sold racks that would hold 6 panels, nothing smaller.

Of course they don’t.

But the good news is that I could build my own out of 2x4s if I wanted!

Um, what?  It’s that easy?  And cheap?

Yes.

I do believe he said the magic words!

So I immediately got on the old Youtube because where else do people go to learn stuff these days?  After watching a few videos that were WAY too technical for me (ie. they used huge drills to make holes in the ground and started welding stuff…so I turned it off).  I got the idea for the design of the frame from this guy:  https://www.youtube.com/watch?v=0aQSrIrqZRg

It’s pretty amazing how much you can learn from there.

Also, thank you Lowe’s for the screamin’ deal I got on the Build-It-Your-Dang-Self solar panel racks:  just under $50!

Parts for the racks:

1 box 2″ Deck Screws

2x4x8 – 15

Industrial hinges – 2

Bolts – 3 (for the supports)

Little bolts – 20 (to hold down the panels) 3/8″ I think…

The bottom has hinges so I can adjust the panels for the season/angle of the sun…

solar2solar1solar5

It went together pretty fast since I didn’t cut any of the 2x4s.

solar4

The blue box in the background is the batteries and inverter and other wires and switches.  They sit up on a platform that I need to build a case around, just haven’t gotten to it yet.

solar3

The only thing I’ll do differently from the video is on the supports.  Instead of permanently screwing them in, I’m going to attach them with bolts; that way I can easily change the angle of the panels.

But more on that later…

Tiny House: Interior Walls

Today, I started putting up the interior walls.  I would explain how excited I am in super flowery words but everything is sore.  Literally.  My back feels like burning and I can’t make a fist.  Probably because I worked 7 hours lifting sheets of plywood over my head and gripping powertools and whatnot.

If I could grip a marker, I’d probably look like this:

excited

There was a lot of that today…gripping little things.  And heavy things.  Navigating awkward sizes of plywood while pushing them against the wall with my shoulder, holding the screwdriver in one hand and the screw in the other and all while trying to not fall off the ladder.

It was an eventful day 🙂

Along with the pencils, rulers, and chalk (a la art class), there was a surprising amount of math class thrown in.  Goodness.  “Math” and I have a tenuous relationship:  sometimes its fun like a game and other times I want to stick my finger in my eye and swirl it around in my head.

Today was a whole new level of math.  It’s hard thinking in 1/4 and 1/8 inches and figuring out the placement of a light switch in the middle of a 4×8 sheet of wood.  That’s probably why my brain hurts too.

Anywhoo, I got about 1/2 the walls up…yay me!

DSC01102
DSC01103DSC01104DSC01105DSC01106DSC01108DSC01109

I’m trying to take my time and plan the seams.  After the walls are up, I”ll go back over the seams with spackle or something brilliant so you really can’t see them.  So far, most of them will be covered up by window trim!

Insulation – in 2:45:00 flat!

Very few things in this little project go quickly.  I mean, for goodness sake, it took me almost a YEAR to figure out the interior.  And even then I’ve changed the bathroom 12 times.

I didn’t expect that the insulation would be fast.  Yes, I knew it was a spray foam, but the “quick” factor never even crossed my mind.

Before I get in to the actual process, allow me to back up a tad.  Just picking a medium for insulation was a process in an of itself.  There are so many choices!  SO. MANY.  Then there is this thing called “R-Value” that is kind of a big deal.  So here’s what I’ve learned so far:

R-value, for those of you who stare at spreadsheets all day and just got your first power tool 6 months ago, is a means to measure how efficient a house is.  The higher the R-value, the better.  It means the structure keeps hot air in (for longer) during cold months and cold air in (for longer) during hot months.  According to the California Building Code, walls have to be an R-value of 13 and ceilings have to be 30-something…maybe 35?  But I could be wrong.

The next thing was the different types of insulation.  It was surprising, really.  Kind of like when you find out your cat is preggo.  “Yay!  Kittens!”  and “Ohhhhhhhh no.  Kittens.”

Each one has a different R-value, different price point, biodegradable, not bio-friendly, chemical-free, will-give-you-cancer-probably….the list goes on.  They literally make insulation out of denim if you want.  Really.  Old shredded up jeans.  It’s amazing.

I picked the spray-foam kind.  Well, more like that was the only choice I had.  When I went to put the siding on the house, there came a point when I was near the roof that I could vent the ceiling.  That meant drilling 2 big holes in each section (high side and low side) and then covering them with mesh something and maybe a cap.  The whole idea is that there is air flow in the ceiling to prevent moisture build-up and mold.  We don’t like mold.

But I decided against venting.  Why?  Well, at that point it was FREEZING outside and I was really done being on a 15-foot ladder.  That’s the jist.  So I left it.  Then come to find out the only way to make it so I don’t have mold and subsequent re-roofing in 18 months is if I completely seal off all wood up there.  The only possible thing that would do it is spray foam.

So cool, spray foam….no problem.  BUT.  If I’d have known how expensive it was I would’ve drilled the holes.  The decision not to drill was an off-the-cuff, game-day thing.  Up until then I was planning on fiberglass if I’m remembering correctly.  The budget was geared toward that, NOT spray foam.

Yep, that part of the budget is blown.

The good news is that from start to finish it took me just under 3 hours!  WIN!  Also, spray foam is super efficient…as in R7 per inch.  That means in 5 inches of foam I can get R35 in the ceiling and in 2 inches, R14 in the walls.

I ordered my kit from Foam it Green company.  There are two chemicals in pressurized tanks that when combined, make a pretty green color.  That way you know you’re insulating correctly.  Pretty handy!

DSC01080

The whole thing comes with safety goggles, gloves, a tyvek suit, booties…they’re serious about their safety.  This is probably the kind that will melt my skin off, but at least my house is well insulated.

DSC01082

The ceiling….  because it had to be so thick, I had to insulate in stages.  If it got too thick or I got the nozzle too close to the ceiling, it glopped down on my head.  As a side note, this stuff gets REALLY hot when it cures.  Thankfully, it only takes 2 minutes to dry!

DSC01085

Glopping…DSC01086DSC01088DSC01091DSC01090DSC01092

Some of it looks like a hot mess, but who cares?  It will be covered by walls!  And I did have a little overspray on the 2x4s and a few spritzes on the window.  Good thing is it will come off with Acetone…all you ladies know it as “nail polish remover”.

So much winning right now.

Tiny House – Plumbing in the Rough

Welp, the pipes are in!  THE PIPES ARE IN!  We are one step closer to sealing up the walls, kids.

Who is the amazing plumber, you ask?  Not me.  I just ordered the pipe rolls on Amazon.  My plumber  – is Jeremy Koyama.  A superhero in the pipe world…or at least he should be!

With my newly-purchased pile of pipes, fittings, faucets, and water heater, I said, “here you go,” and he said those few words that (turns out) I LOVE to hear:  “Cool.  I’ll take care of it.”

And he did!

The starting pile…

DSC01042DSC01043

This is where water comes in to the structure (on the left), breaks off to the water heater, and continues on to the bathroom sink…

DSC01071

Bathroom pipes, no fittings…DSC01045


…with fittings…DSC01065

DSC01069

pipes running up the wall from the bathroom and through the ceiling…

DSC01047


…and to the kitchen!DSC01046DSC01066


Kitchen sink, drain, and propane pipeDSC01067


DSC01064


Water inlet valve on the outside of the bathroom wall…DSC01063


…next to the installed water heater!DSC01072


Leftover pipes…DSC01068

When the walls are in then we’ll have to finish out the plumbing with all the fixtures and I’m sure other things.  YAY!

Tiny House – Wiring 

Of all the systems in the tiny house, electric is the one that I understand the least.  I vaguely remember my physics class from high school and talking about amps, watts, and voltage, but I can’t for the life of me tell you what they do or why they’re important.

Oh, electricity.

For the past several months I’ve been researching wiring, solar-powered systems, batteries, and I still have a headache.  Some blogs I find say, “Oh, wiring is EASY!  Just run wire in the walls and attach it to the box with the blinky lights and switches and the thing and the face.”  At least that’s what it ends up sounding like in my head.  Those people that say electric stuff is easy must be electronic geniuses.

I actually did consider installing all the wire myself, but then a friend told me I needed a “wiring plan” and I about had an emotional breakdown.

how that works

Therefore, I hired an electrician to install all the things.  Sorry, beyond wires and light switches I don’t know the names for electronic stuff.  My electrician’s name is Tom Weldon and he really is an electronic genius.  If you need electric work, here is Tom’s website:  http://www.welldoneelectric.com/

I’m so glad there are people like him who see an electric system as “no big deal” as opposed to…other people…who research electric systems until any mention of a breaker panel makes them tear up so they decide to go on the youtube and watch cat videos instead.

Tom told me that yes, I do need a wiring plan, but it can be as simple as telling him where I want switches and outlets.  Sweet!  I can handle that.  To make it all “pretty” I put the plan in Excel.  Why?  Because I’m in finance, that’s the program I know, and it looks better than drawing on notebook paper.  Also, it worked, so who cares.

DSC01036DSC01037DSC01038DSC01039DSC01041

In my research, I did learn that in order to get insurance you need to have one of two things:

1 – Inspection of the wiring work, or

2 – A licensed electrician do the installation

This is the Portland, OR, insurance company where I found the information:  http://www.insuremytinyhome.com/

Insurance was the biggest reason I hired out the electric.  Also because I don’t want my cool little house to go down in flames because I didn’t get the “right gauge” and I “accidentally crossed” all the “wire connectors.”

Once I pick up my solar panels and other stuff that I just ordered, we can finish out the electric system!


Tiny House: Blessed Interruptions

Ok, so it’s been a while.  Two months or so?  Anyway, I haven’t given up on building, died, or otherwise smacked my little head on the pavement.  Here’s a recap of what’s happened since January…

All along, I’ve had this plan.  A grand plan really of building a tiny house, doing all the construction myself, being done in less than a year, and under budget.  What can I say, I dream big!

To this point, most of the construction I’ve done myself.  I hired out the framing because all those materials are super heavy and it would’ve taken me months to hoist all that stuff myself.  I hired out the electric work because I don’t want to go down in flames and I want to eventually get insurance (which you can’t get unless you have a licensed electrician do the install or get your work inspected).  And now I’ve hired out the plumbing because I don’t want to drown in my sleep.

At any rate, I’m slowly but surely plodding along, learning you have to caulk everything, where to get the best deals on flooring and fixtures, and what “deburring” means.  Then around mid-January while I was waiting on the weather to warm up (so I could put caulk on the exterior), I got an email that went something like this:

“Hey guess what?  Some people that were supposed to lead a kid’s program at a conference bailed at the last minute.  Is there any way you can help out?  Oh yeah, the conference is in a month and it’s in Thailand.”

My first thought was…well, I didn’t think at first, I laughed.  If ever there was an impossible situation, it was this.  Then secondly, I thought, “Um, no.  There’s no way!”  But I asked my friend to give me two days to give her an answer and that I’d pray about it.

In those two days, I tried to figure out every way it could possibly work.  As I prayed, I made a list of all the “things” in my head that I thought needed to be taken care of in order for me to go.  The list is in a journal somewhere that is currently in a box, but the jist is this:  A last-minute international flight? Lodging for almost two weeks?  No time off work?  A house-sitter? AND I’m supposed to be moved out of the condo and in to the interim-room-but-not-quite-the-tiny-house-yet situation by March 1.  If I went to the conference, I’d be home with just one week to move out.

After the two days were up, I knew I had to approach my boss about the time off.  Oh, AND I work in finance…this time of year is budget season otherwise known as “the busiest season of the year.”

Then the most amazing thing happened:  every question was answered and every detail fell in to place.  I literally did nothing.  Boss was ok with me being gone.  I had enough air miles to get a flight for free.  Lodging was taken care of. A family friend was stoked to stay at the condo for two weeks.  And some great friends offered to help me move when I got back to town.

So off I went!  It was a whirlwind full of hot weather, new languages, smiling kiddos, and sweet friends.

Here are the highlights of the blessed interruption to “my plans”…

Flying out of SF

DSC00878

1st morning in Hua Hin, Thailand…those are local fishermen who work for the beach restaurant just down the way

DSC00902


Jet lag helps you get up with the sunrise…also, it was so glorious I didn’t want to miss it!DSC00897DSC00900

Mango in a bag.

DSC00894


Huge tropical flowers DSC00913DSC00914DSC00915


The kiddos…I helped with the crafts so everyday we made the stickiest, glittery-est messes…DSC00936


…decorating our flip flops…DSC00939DSC00953


…and name tags…DSC00955


…making Valentines for parents…DSC00963DSC00964


and eating frozen jello….which looked disgusting but she loved it.DSC00968

They also learned songs which they performed for the parents at the end of the conference…DSC00976

DSC00973


After the conference, I got to see a little of the country… like how they “do” electricityDSC00997


…and construction…DSC00994


…driving…which is not as scary as driving in India…DSC01005


…and shopping at the night market.DSC01018DSC01016DSC01008DSC01009DSC00970


Tiny House Downsizing: Where did I get so much stuff?

“Stuff” is a funny thing.  It’s useful.  It’s pretty.  Sometimes it’s both.

I think I’ve mentioned before how my house is decorated *exactly* how I always wanted.  It definitely falls into the “both” category of function and beauty.  Now I find myself at the point of getting rid of said stuff.

It’s weird.

As of today, I’ve made 3 donation trips with a FULL car.  Clothes, skis, random metal art you’re supposed to put on the wall (I think), books, movies, and various kitchen spoons and whatnot.  Where in the WORLD did I get all this stuff?!  Some of it has certainly been more difficult to part with, but I think I’m getting the hang of it.

Don’t think, just pack.  Don’t think, just drive.  Don’t think, just hand it to the nice lady.

Lest you think I have tiny house cold feet,  I am actually totally stoked about moving in to my little house and only using stuff I actually need and not carting around a load of crap everywhere I go. Today, however, I found myself hesitating.

It all started when I decided to rip off the proverbial band-aid and sell all the big stuff.

“But I LIKE that dresser!  I refinished it all by myself and it looks cool!”

DSC00821

“That was the first couch I ever bought…”

DSC00829 - Copy

“…and I’m pretty sure I can get that table to fit in the tiny house….right?”

Yes, all of these conversations I’ve had with myself over the past several months.   And especially today.

It has officially been online for 7 hours and I’ve sold my couch, dresser, dining table and chairs, mirror, coffee table and side table.  Maybe even the TV stand.

That was fast.  Thankfully, it wasn’t the type of band-aid that breaks or gets stuck in your arm hair.