Tiny House – One month in: What it’s really like living in less than 300 square feet and taking care of your own poop.

Welp, it has officially been a little over a month (1 month and 8 days) and I have to say, I don’t love it.

Oh wait, I ABSOLUTELY love it!

With all the things about living in this space that I expected and even the things I didn’t really see coming, I love it more than I thought I would.

There are definitely things I expected…

Like I can’t leave crap laying around….at all. Two things quickly become a mountain that blocks a window making it necessary to put clothes, shoes, groceries, mail, etc., away immediately when I get home. I mean, I already did that before I moved in…

I expected that my toilet would be a 5 gallon Lowe’s bucket.

I expected that I would really like having my closet in the bathroom so when I get out of the shower (which is like standing under a searing firehose of awesomeness), I’d have my clothes ready to go.

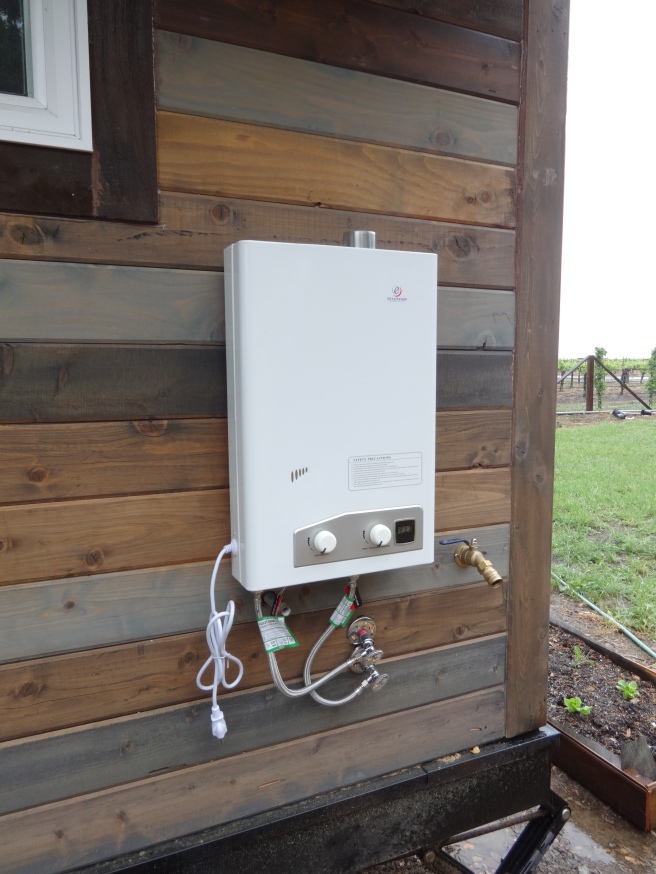
I expected that I’d be so thrilled at having a gas stove, the kitchen designed with all the things I need right at hand, miles of counterspace, and a ridiculously cool sink, that just reheating leftovers would inspire tears of joy.

And then what I didn’t see coming…

I didn’t expect that a 5 minute shower would overflow the drain bucket outside making the ground muddy around the bucket. Emptying it is a tricky endeavor in your clean clothes and newly-scrubbed self.

I didn’t expect that I’d be nervous using my toilet for…..big jobs. At one point I really had to go but I chickened out and went to Target instead. I have since mustered up the courage to just do it and it wasn’t the crisis situation I thought it would be.

I didn’t expect that propane would be $4.54/gallon, but my 5 gallon tank has lasted 1 month and 8 days and still going strong. I’d say that was $23 well spent.

I didn’t expect that my downsizing efforts wouldn’t be sufficient. I still have several boxes I haven’t brought in to the house and I’m thinking they’ll end up donated.

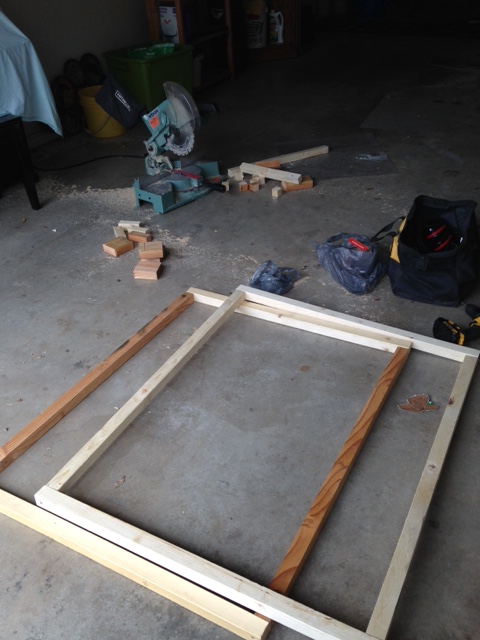
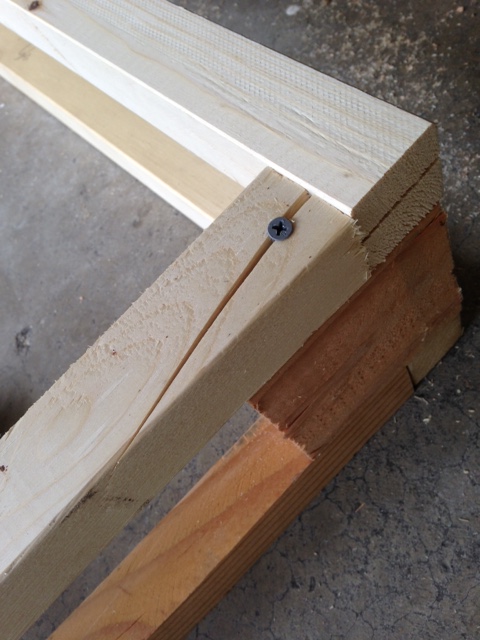
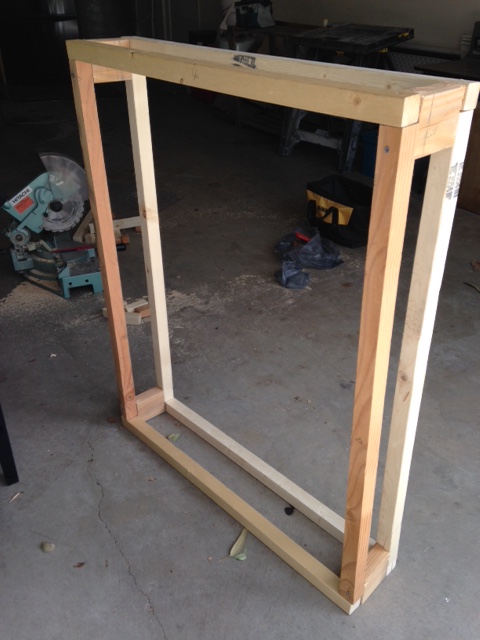
Here are some pictures of “real life” I took yesterday:

Countertops. Good for washing dishes, prepping food…..and the turkey is brining in that bucket on the floor…

img_2979

Bathroom vanity still doesn’t have the front piece.  I’ll get around to it eventually…

img_2980

One of my favorite places to sit…read cooking magazines and do crossword puzzles…

img_2982

It was sunny yesterday so it was a good time to do laundry…

img_2988

The drain bucket for the shower…

img_2985

that gets emptied on the garden…

img_2986

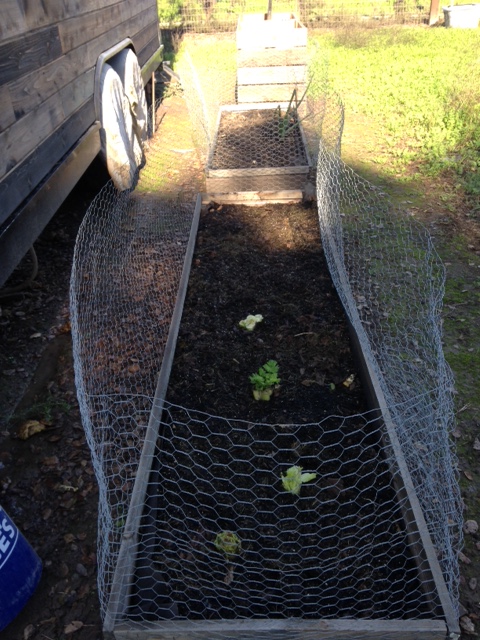
…and the compost bin

img_2987

The only books I can keep for now…

img_2983

and the shoe storage! which turned out SUPER cool and totally works!

img_2984

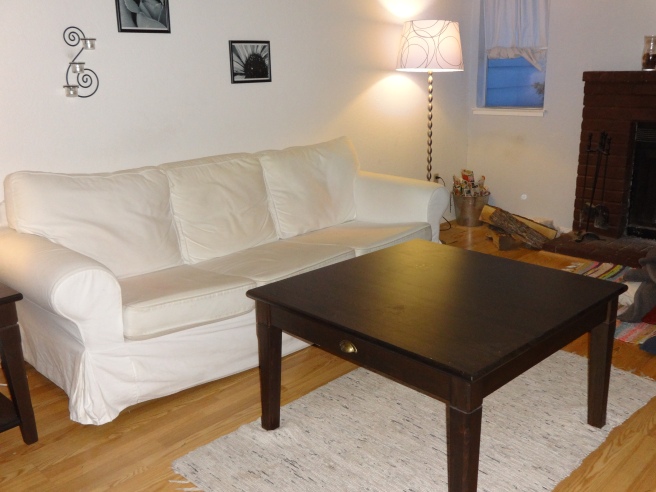
And the couch, post-straightening. It cleans up pretty well, right?

img_2989


AND the ACTUAL retail price IS…..

…. $30,206.38.

Earlier on in this process I posted my budget for this tiny house construction project. As I’ve gone along I keep updating what I actually spend and monitor where I thought I’d be to where I actually landed.

ben1

Here is a high-level breakdown:

Totals Budget Actual % +/-
Total House  $  27,996.07  $    30,206.38 -8%
Structure  $  17,411.17  $    20,873.08 -20%
Kitchen  $    2,688.57  $          582.62 78%
Bathroom  $    2,792.50  $          668.01 76%
Fixtures  $    1,773.78  $      1,018.45 43%
Deck  $        330.05  $          287.99 13%
Contingency  $    3,000.00  $      6,776.23 -126%

I’m actually pretty pleased with only being 8% over and never having done this before! Don’t let what looks like a lot of savings in the Kitchen and Bathroom fool you…a lot of those costs are in the Contingency.

So. What have I learned?

My mentor was right: construction projects always take more time and cost more than you plan. It’s annoying, but true.

 Total construction time = 14 months (planned for 12 months)

Total cost = about $30K (planned about $28K)

If this was a project that I had for work and you were sitting with me at my desk, you might hear my boss ask, “Why is this project overbudget?”

Let’s look at the list…

Mostly this is due to things I didn’t budget for. It’s probably a function of never doing this before and not having any idea what to expect, but in all, there are about $7,200 of costs that weren’t in the original budget.

Things like:

Tools  $          807.00
Electric install  $       1,600.00
Plumbing install  $          800.00
Water Line  $             75.00
Tool rentals  $          245.00
Food for helpers  $          100.00
Trailer pickup  $          421.00
Misc Building supplies  $       3,161.00
TOTAL  $       7,209.00

If I had put all those things in the original budget, I’d be 14% under budget. UNDER! I like that concept…it feels like winning. But anyway.

c826f15dc90db6cbabfcd1bc8ff20936

A few items I purchased because I thought they looked awesome (like a shower drain or sink drain) and neither one I could use…they were the wrong thing. There is apparently a difference in stuff like that and you have to be specific. This is stuff you learn when you hire someone who knows what they’re doing to install technical things. In my defense, they still look awesome.

Some things I could have gone cheaper (like closet rods or shelves), but I liked the look of the galvanized pipe so much I just went with it. It’s quite a bit more expensive to go that route.

More expensive than plan:

Spray-in Insulation

Cabinet hardware

All things having to do with solar power

LESS expensive than plan:

Homemade light fixtures

Vinyl flooring

Reselling tools I won’t use again

Reselling left over materials

In looking at this budget, I’d estimate there are probably $500 or so of costs that aren’t represented. Random trips to Lowe’s, trim board, building furniture, etc… it adds up!


Tiny House: Water Heater…making the outside the inside

One of the many challenges of building a tiny house is trying to fit all the things you need inside.  Either you find a smaller version of said “thing” or you throw it out altogether.

For the water heater, I had to find a little one.  As much as I like the idea of kickin’ it pioneer style, I still want a hot shower now and then.

I chose a gas-powered instant hot water heater by Eccotemp.  BUT it is technically an indoor water heater.

You guys…I tried to get it to fit inside.  It just wouldn’t go.  Either it wouldn’t fit in between the studs (so it could be hidden), or it needed to be vented outside and would make for a weird hole in the wall (so much of this project comes down to aesthetic for me), or it stuck out from the wall in an obnoxious, HERE’S-A-WATERHEATER, kind of way.

So, I put it outside.

DSC01072

Now the challenge was, how do I make it an “inside” waterheater again?  The only option was to build a case around it that was vented, but protected from the sun.

cover1

Lack of pre-drilling sometimes leads to this…

cover2cover3cover4

Leftover screen (from a screen repair project) made for a perfect  bottom and top cover!

cover8

Also, leftover siding…

cover6cover7cover10cover11

The hinges work and everything! I’ve since stained the wood to blend in a little better 🙂  If you have leftover materials, fight the urge to throw it away until after you’re completely done.  You never know what you could repurpose next!

Thanks to Lucy and Tacy for coming out and helping me finish the doors 🙂

Nobody makes me bleed my own blood…but router bits do.

Today was such a good day!  My friend Steve stopped by to say hi, I learned I’m getting a new niece or nephew in October (YAY Steve and Daisha!), got to eat at my fav food truck, AND I finished painting the interior!

Friend Steve …

steve!

I was SO excited to have finished painting that I went down to the Home Depot and bought a router.  This tool I have to have to cut out the wood I put over the windows (so I could paint).  I was stoked that I even knew what tool to get (due to previous research and scouting)…you can imagine my excitement when I got back home and there was daylight left!

But in the middle of opening up the router-bit clamshell package that is designed to survive Armageddon, something slipped.

I looked down and saw this…

DSC01199

That was nothing compared to the crime scene that was now on my hand.

Annoyed that I couldn’t finish the windows, I walked over to the spigot to wash off the torrent of red and see how deep this cut really was.  After about a minute of thorough flushing, I still couldn’t tell.

I had to go in to the main house for a second opinion:  Stitches…or No?

When we finally got the bleeding to stop, this is what it looked like…

DSC01192

Not amused ^

The split…

DSC01193

Pretty clean, right?

My friend Lisbet and I decided that it could probably go either way with the Urgent Care and the stitches.  I could go wait for hours and pay several hundred dollars for stitches, or I could butterfly it at home.  Also, we have wine at home.

Can you guess which one I chose?  🙂

DSC01194

The kitchen ER ^

DSC01195DSC01197

The butterfly ^

DSC01198

The “I’m Super Excited About This” face, also the “I Can Feel My Heartbeat in My Finger” face ^

The paint turned out really well though so at least there’s that… I’d explain more but it kind of hurts to type and 3-finger typing is weird.

DSC01200DSC01201

Lessons for the day:

  1. Rent paint sprayers.  They are worth the money when you can finish painting in 15 minutes.
  2. Gallons of paint are expensive.  Be prepared.
  3. Routers are cool.
  4. Router bits are rat bastards.
  5. Kitchen ERs are far superior to other ERs .
  6. Butterfly, butterfly, butterfly.

Dang.  I could really use some chocolate.

Insulation – in 2:45:00 flat!

Very few things in this little project go quickly.  I mean, for goodness sake, it took me almost a YEAR to figure out the interior.  And even then I’ve changed the bathroom 12 times.

I didn’t expect that the insulation would be fast.  Yes, I knew it was a spray foam, but the “quick” factor never even crossed my mind.

Before I get in to the actual process, allow me to back up a tad.  Just picking a medium for insulation was a process in an of itself.  There are so many choices!  SO. MANY.  Then there is this thing called “R-Value” that is kind of a big deal.  So here’s what I’ve learned so far:

R-value, for those of you who stare at spreadsheets all day and just got your first power tool 6 months ago, is a means to measure how efficient a house is.  The higher the R-value, the better.  It means the structure keeps hot air in (for longer) during cold months and cold air in (for longer) during hot months.  According to the California Building Code, walls have to be an R-value of 13 and ceilings have to be 30-something…maybe 35?  But I could be wrong.

The next thing was the different types of insulation.  It was surprising, really.  Kind of like when you find out your cat is preggo.  “Yay!  Kittens!”  and “Ohhhhhhhh no.  Kittens.”

Each one has a different R-value, different price point, biodegradable, not bio-friendly, chemical-free, will-give-you-cancer-probably….the list goes on.  They literally make insulation out of denim if you want.  Really.  Old shredded up jeans.  It’s amazing.

I picked the spray-foam kind.  Well, more like that was the only choice I had.  When I went to put the siding on the house, there came a point when I was near the roof that I could vent the ceiling.  That meant drilling 2 big holes in each section (high side and low side) and then covering them with mesh something and maybe a cap.  The whole idea is that there is air flow in the ceiling to prevent moisture build-up and mold.  We don’t like mold.

But I decided against venting.  Why?  Well, at that point it was FREEZING outside and I was really done being on a 15-foot ladder.  That’s the jist.  So I left it.  Then come to find out the only way to make it so I don’t have mold and subsequent re-roofing in 18 months is if I completely seal off all wood up there.  The only possible thing that would do it is spray foam.

So cool, spray foam….no problem.  BUT.  If I’d have known how expensive it was I would’ve drilled the holes.  The decision not to drill was an off-the-cuff, game-day thing.  Up until then I was planning on fiberglass if I’m remembering correctly.  The budget was geared toward that, NOT spray foam.

Yep, that part of the budget is blown.

The good news is that from start to finish it took me just under 3 hours!  WIN!  Also, spray foam is super efficient…as in R7 per inch.  That means in 5 inches of foam I can get R35 in the ceiling and in 2 inches, R14 in the walls.

I ordered my kit from Foam it Green company.  There are two chemicals in pressurized tanks that when combined, make a pretty green color.  That way you know you’re insulating correctly.  Pretty handy!

DSC01080

The whole thing comes with safety goggles, gloves, a tyvek suit, booties…they’re serious about their safety.  This is probably the kind that will melt my skin off, but at least my house is well insulated.

DSC01082

The ceiling….  because it had to be so thick, I had to insulate in stages.  If it got too thick or I got the nozzle too close to the ceiling, it glopped down on my head.  As a side note, this stuff gets REALLY hot when it cures.  Thankfully, it only takes 2 minutes to dry!

DSC01085

Glopping…DSC01086DSC01088DSC01091DSC01090DSC01092

Some of it looks like a hot mess, but who cares?  It will be covered by walls!  And I did have a little overspray on the 2x4s and a few spritzes on the window.  Good thing is it will come off with Acetone…all you ladies know it as “nail polish remover”.

So much winning right now.

Tiny House Downsizing: Where did I get so much stuff?

“Stuff” is a funny thing.  It’s useful.  It’s pretty.  Sometimes it’s both.

I think I’ve mentioned before how my house is decorated *exactly* how I always wanted.  It definitely falls into the “both” category of function and beauty.  Now I find myself at the point of getting rid of said stuff.

It’s weird.

As of today, I’ve made 3 donation trips with a FULL car.  Clothes, skis, random metal art you’re supposed to put on the wall (I think), books, movies, and various kitchen spoons and whatnot.  Where in the WORLD did I get all this stuff?!  Some of it has certainly been more difficult to part with, but I think I’m getting the hang of it.

Don’t think, just pack.  Don’t think, just drive.  Don’t think, just hand it to the nice lady.

Lest you think I have tiny house cold feet,  I am actually totally stoked about moving in to my little house and only using stuff I actually need and not carting around a load of crap everywhere I go. Today, however, I found myself hesitating.

It all started when I decided to rip off the proverbial band-aid and sell all the big stuff.

“But I LIKE that dresser!  I refinished it all by myself and it looks cool!”

DSC00821

“That was the first couch I ever bought…”

DSC00829 - Copy

“…and I’m pretty sure I can get that table to fit in the tiny house….right?”

Yes, all of these conversations I’ve had with myself over the past several months.   And especially today.

It has officially been online for 7 hours and I’ve sold my couch, dresser, dining table and chairs, mirror, coffee table and side table.  Maybe even the TV stand.

That was fast.  Thankfully, it wasn’t the type of band-aid that breaks or gets stuck in your arm hair.

Tiny House Siding: So close…

Over the past few weeks, I’ve been working on finishing up the siding.  The goal was to get it ALL done before it rained, but as most everything with this project, it is going a lot slower than I expected.  Where it stands right now, I’m 2 1/2 rows of siding from being done.  Also, it started raining a few days ago.

DSC00768

Going around this fender was MUCH easier than the other side.  I’m glad too because that’s the one you’ll see the most 🙂

DSC00769DSC00770DSC00771DSC00772DSC00766DSC00776

The one side that is officially all done ^

This little booger took almost 3 hours to figure out…I ended up making a protractor out of a screw and dental floss!  Yay MATH!  I think the porch light will cover the bobbles nicely 🙂

DSC00778


DSC00777

Oh the siding is just so close…

DSC00775

Next up…I get to go back over the siding and fill in holes and gaps, and caulk the edges.  Then it’s on to the INTERIOR!

Tiny House Siding: Frost and Friends and Fun Times

When I lived in San Francisco, I did a short turn as a real estate agent.  Part of the time was spent partnered with a developer who was kind enough to let me follow him around peppering him with questions while I tried to soak up everything there was to know about remodel projects.

One of the first things he taught me is this: “Construction always cost more and takes longer than you think.”

With certainty, I can say the latter is true.  I’m not yet ready to concede the costing more….not if I can help it!

So “my plan” once again was to have this tiny house of awesomeness completely done on the outside by today.  That didn’t happen….

I showed up to the house bright and early Thanksgiving day ready to start siding and I found this….DSC00735DSC00734

Frost so thick you could write in it…and I did.

DSC00738

Come to find out, it had only warmed up to 34 degrees by 8am.  I had to wait until 9:30 when the wood was thawed enough to see what color I was picking up.

On a side note, it hasn’t been this cold here since I don’t remember when…and I’ve lived here coming up on 8 years.  The trees are SO vibrant and I love that so I suppose I can tolerate frozen-ness for the pretty colors…

DSC00753

DSC00752

Then it was time to get to work…

DSC00729

Duane helped nail up siding…

DSC00731DSC00733

My cousin Nate is a master with power tools which was awesome when it came to cutting the pieces to fit around windows…

DSC00742DSC00741

And Jake finished out the window foam on the inside…

DSC00740DSC00745

Aaron and Nate installed the door.

DSC00744DSC00743DSC00748

Then Friday I showed up to more frost, although it was only 38 degrees…

DSC00749

I managed to get quite a bit done but it took a long time to get the pieces under the windows to fit right.  At one point I worked for an hour cutting all the notches and making sure the board had all the right measurements….only to go put it in and watch it break in two places.  At that point I’m sorry to say I reverted to my 5 year old self and threw the broken pieces across the yard.  With my left hand.  From on top of a ladder.

Clearly, it was time to go get food and try again later….

DSC00750DSC00751

In all, I got 8 rows done….not too shabby.

Then yesterday this happened!  Aaron and Duane helped me set the difficult angled pieces on the ends of the short wall.

DSC00756DSC00755DSC00757

And it turned out PERFECTLY!

DSC00758DSC00760

We got both upper ends done as well as the door trim and in about 4 hours.  All the hard work and freezing temperatures called for celebratory drinks and fries 🙂

DSC00762

So the first thing I ever learned about construction, so far, is half true.  I didn’t get ALL the siding done this week.  But I got to hang out with good friends, spend time outside in beautiful weather (made much more enjoyable when I remembered my hot coffee, gloves, and down vest), and the house is turning out exactly like I pictured it.  I have a lot to be thankful for!

Tiny House Construction: Internal (sometimes) Monologues

As I continue to foray in to construction land, I’ve noticed there are quite a few things I say to myself over and over again.   Sometimes out loud.  Sometimes in my sleep…

  1.  This isn’t a race.
  2. Measure twice, cut once.
  3. Eh….close enough.
  4. Engage the core and trust the ladder.
  5. Measure twice, cut once dang it.
  6. I bet I could learn about that on Youtube.
  7. That wasn’t the plan.
  8. Well….shoot.
  9. Alright, who can I hire to do this?
  10. Yep.  Totally worth it.

DSC00711

Windows and Siding: Slow and Steady Wins the Race

Last week we managed to get quite a bit done.  I say “we” because some awesome friends came out to help install windows, level them, and make sure they were right-side-up…

DSC00693

Carnage from cutting out window holes

DSC00698


DSC00697DSC00696DSC00695

Anything to keep water out…

DSC00694DSC00702DSC00703

The roof is also waterproofed (finally) so I can insulate and close off the underside of the lofts…

DSC00704DSC00707

My friend Luke came to help do some heavy lifting…and work magic with the circular saw 🙂

DSC00706

Time for trim and siding…

DSC00705DSC00708DSC00713DSC00712

The easiest way to attach trim to the top was by hanging off the roof…

DSC00718DSC00716

It only took two tries to get the piece to fit under the window!

DSC00717DSC00720

It’s coming along slowly but surely…I’m SO happy with the way the colors turned out for the siding.  It’s exactly like I pictured it 🙂